Đây là hướng dẫn cách sử dụng phần mềm quản lý khách hàng kiêm quản lý dự án. Để sử dụng vui lòng liên hệ bộ phận System tại Manage để cài đặt phần mềm. Chúng tôi sẽ cài đặt toàn bộ công cụ trên máy chủ và gửi quý khách thông tin đăng nhập.
Nếu quý khách muốn cài đặt trên máy chủ của quý khách. Vui lòng đáp ứng được cấu hình sau:
PHP 5.6.4+ (PHP 7.1+ recommended)
MySQL 5.1+
mod_rewrite Apache
MySQLi PHP Extension
PDO PHP Extension
cURL PHP Extension
OpenSSL PHP Extension
MBString PHP Extension
iconv PHP Extension
IMAP PHP Extension
GD PHP Extension
Zip PHP Extension
allow_url_fopen enabled
System Admin bên chúng tôi sẽ không cấu hình cho máy chủ của quý khách vì Lý do Bảo mật và Tranh chấp nếu xảy ra sự cố (Đơn giản vì có thể Admin đang quản lý máy chủ của quý khách đã tắt một vài chức năng trên. Vì nguyên do nào đó sẽ ảnh hưởng đến Website hoặc hệ thống khác mà quý khách đang sử dụng).
Vì vậy nếu trong quá trình cài đặt xảy ra lỗi do máy chủ của quý khách. Vui lòng liên hệ bộ phận IT của quý khách để tự khắc phục điều này. Sau đó thông báo đến chúng tôi để tiếp tục tiến hành cài đặt hệ thống CRM & Quản lý dự án Manage.vn
Nếu quý khách không có máy chủ riêng. Đừng lo vì tại Manage.vn khi quý khách sử dụng hệ thống. Chúng tôi đã miễn phí máy chủ đủ mạnh cho 12 tháng đầu tiên để quý khách an tâm sử dụng.
HotKeys
Những hotkeys sau chỉ được sẵn sàng cho khu vực Admin, Hotkeys không được hỗ trợ trong khu vực thành viên
Create New Records
Shift + C – Tạo khách hàng mới
Shift + I – Tạo hóa đơn mới
Shift + E – Tạo dự toán mới
Ctrl+Shift+P – Tạo đề xuất mới
Ctrl+Shift+E – Tạo chi phí mới
Shift+L – Tạo khách hàng tiềm năng mới (mở modal KHTN)
Shift+T – Tạo nhiệm vụ mới (mở modal nhiệm vụ mới)
Shift+P – Tạo dự án mới
Shift+S – Tạo vé hỗ trợ mới
Ctrl+Shift+S – Tạo nhân viên mới
Điều hướng đến các khu vực cụ thể
Alt+D – Đi đến bảng điều khiển
Alt+C – Chuyển đến danh sách khách hàng
Alt+T – Đến Danh sách công việc
Alt+I – Chuyển đến Danh sách Hóa đơn
Alt+E – Đi đến danh sách ước tính
Alt+P – Chuyển đến danh sách dự án
Alt+L – Đi đến danh sách khách hàng tiềm năng
Ctrl+Alt+T – Đi đến danh sách vé hỗ trợ
Ctrl+Alt+E – Đến Danh sách chi phí
Alt+R – Chuyển đến Báo cáo bán hàng
Alt+S – Đi tới Phần Cài đặt
Misc
Shift+K – Thanh tìm kiếm hàng đầu tập trung và sẵn sàng để tìm kiếm
Shift+D – Bảng tập trung tìm kiếm và sẵn sàng để tìm kiếm (chỉ khớp với bảng đầu tiên được tìm thấy trong tài liệu)
Ctrl+Shift+L – Đăng xuất
Conditional hotkeys
Shift+F
Đánh dấu tác vụ hiện tại là đã hoàn thành – Chỉ áp dụng khi phương thức tác vụ được mở
Shift+E
Chỉnh sửa tác vụ hiện tại – Chỉ áp dụng khi phương thức tác vụ được mở
Chỉnh sửa Khách hàng tiềm năng – Chỉ áp dụng khi phương thức khách hàng tiềm năng được mở
Shift+C
Chuyển đổi khách hàng tiềm năng hiện tại thành khách hàng – Chỉ áp dụng khi phương thức khách hàng tiềm năng được mở
Tạo nhận xét tác vụ mới – Chỉ áp dụng khi phương thức tác vụ được mở
Các phím nóng được đề cập ở trên chỉ được thử nghiệm trên HĐH Windows
System Language
Tạo ngôn ngữ mới
Với Manage.vn CRM, bạn có thể dễ dàng thay đổi ngôn ngữ. Bạn chỉ cần dịch tất cả các chuỗi dựa trên nhu cầu của bạn.
Điều hướng đến ứng dụng / ngôn ngữ và sao chép thư mục tiếng Anh mặc định.
Đổi tên thành thư mục trong ngôn ngữ bạn muốn dịch. Ví dụ: Tiếng Pháp
Bạn phải đổi tên các tệp bên trong dựa trên tên thư mục chính eq. chúng tôi đã đổi tên thư mục mới của chúng tôi thành tiếng Pháp và các thư mục này nên được đổi tên như thế này: french_lang.php
Dịch tất cả các chuỗi thông qua trình soạn thảo mã yêu thích của bạn và điều hướng đến Setup -> Settings -> Localization bạn sẽ thấy rằng ngôn ngữ của bạn có sẵn trong danh sách thả xuống, chọn ngôn ngữ đó và lưu các thay đổi.
Nếu ngôn ngữ bạn đang cố dịch đã tồn tại trong tệp Manage.vn CRM đi kèm với gói được đề xuất để đổi tên thư mục / tệp ví dụ. my_french and my_french_lang.php
Nếu bạn đang sử dụng ngôn ngữ không tồn tại trong Manage.vn CRM, hãy đảm bảo sau mỗi lần cập nhật để sao chép tất cả văn bản mới sau # Version X.X.X từ tập tin tiếng Anh gốc nằm ở application/language/english/english_lang.php
Ghi đè văn bản dịch
Mã hóa
Các tệp ngôn ngữ trong Manage.vn CRM sử dụng mã hóa UTF-8, khi tạo tệp ghi đè ngôn ngữ, điều quan trọng là phải duy trì cùng một mã hóa.
Ký tự đặc biệt
Nếu bạn muốn sử dụng ký tự đặc biệt trong văn bản dịch của mình, bạn phải thay thế bằng ký tự ‘
Eq:
$lang['language_text_key'] = 'Text with 'quotes';
Thiết lập Lead form từ Web
Tính năng Manage.vn CRM Leads cho phép bạn xây dựng một biểu mẫu web dựa trên các trường dẫn và trường tùy chỉnh để đặt nó trên trang web của bạn, trang đích, v.v. như một iframe.
Sau đó, khách truy cập có thể nhập tên, địa chỉ email, tải lên tệp đính kèm và thông tin cơ bản khác để tạo khách hàng tiềm năng trực tiếp trong Manage.vn CRM.
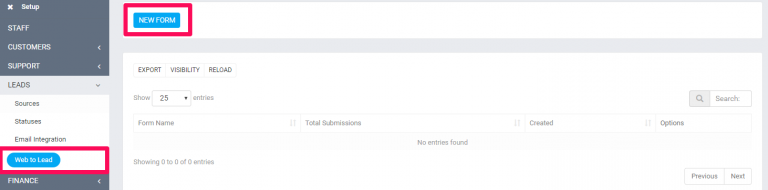
Để tạo web mới để dẫn mẫu, từ menu quản trị chính điều hướng đến Setup->Leads->Web To Lead
Bấm vào nút ở phía trên bên trái nút New Form
NOTE: Bạn sẽ có thể tạo biểu mẫu sau khi bạn tạo biểu mẫu ban đầu bao gồm tất cả các cài đặt.
Form Name – Đặt tên cho biểu mẫu của bạn, tên này để sử dụng cá nhân và cũng sẽ được hiển thị trong hồ sơ khách hàng tiềm năng khi bạn mở khách hàng tiềm năng.
Language – Ngôn ngữ hiện chỉ được sử dụng cho các thông báo xác nhận.
Submit button text – Phần dưới cùng mà người dùng sẽ cần nhấp để gửi biểu mẫu E.q. Yêu cầu báo giá hoặc Liên hệ với chúng tôi, vui lòng điều chỉnh để phù hợp với nhu cầu của bạn.
Message to show after the form is successfully submitted – Thông báo này sẽ được hiển thị sau khi sử dụng thành công gửi biểu mẫu.
Allow duplicate Leads to be inserted into a database? – Thông thường trong web để dẫn biểu mẫu khách hàng tiềm năng trùng lặp được chèn vào cơ sở dữ liệu. Manage.vn CRM có khả năng ngăn điều này xảy ra bằng cách tự động tạo khách hàng tiềm năng dưới dạng nhiệm vụ bao gồm tất cả dữ liệu biểu mẫu dưới dạng mô tả thay vì chèn trực tiếp vào cơ sở dữ liệu khách hàng tiềm năng, trong trường hợp này, nhân viên có trách nhiệm sẽ cần phân tích dữ liệu khách hàng tiềm năng và có những hành động tiếp the
Source – Nguồn khách hàng tiềm năng măc định
Status – Khách hàng tiềm năng sẽ cần ở trạng thái sau khi được nhập thành công vào Manage.vn CRM database.
Responsible – Tự động chỉ định khách hàng tiềm năng cho một nhân viên cụ thể.
Notification settings – Tất cả người dùng dựa trên loại thông báo sẽ được thông báo qua thông báo tích hợp bên trong Manage.vn CRM và ngoài ra, nhân viên chính có trách nhiệm sẽ nhận được thông báo qua email nếu trong Setup->Email Templates -> Khách hàng tiềm năng mới được chỉ định cho nhân viên không được bật một cách tự động.
Recaptcha – Bạn có thể sử dụng Google Recaptcha để ngăn chặn spam. Trường cho Google Recaptcha sẽ chỉ được hiển thị nếu trước đó bạn đã định cấu hình các khóa recaptcha.
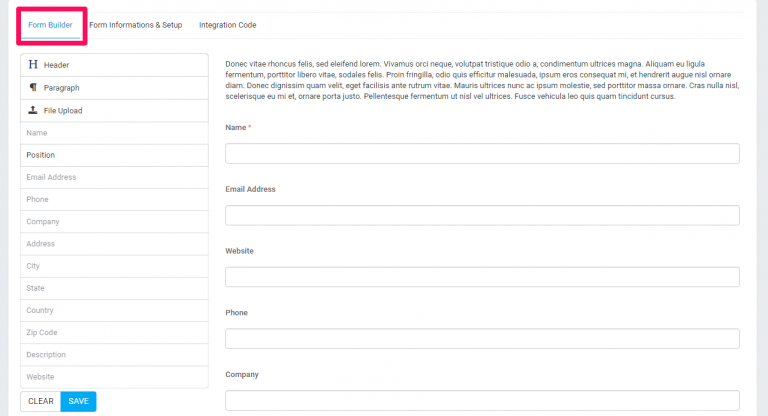
Sau khi bạn tạo biểu mẫu, 2 tab mới sẽ được hiển thị trong khu vực biểu mẫu Trình tạo biểu mẫu và Mã tích hợp.
Form Builder – Nơi bạn xây dựng biểu mẫu và điều chỉnh tất cả các trường bạn cần.
Mã tích hợp là mã bạn sẽ cần đặt vào trang web của mình biểu mẫu sẽ được hiển thị, lưu ý rằng từ liên kết bạn sẽ có thể thấy rằng mỗi mã đều có khóa duy nhất.
Tạo một form mới
Khi bạn lưu cài đặt biểu mẫu ban đầu, bạn sẽ được tự động trỏ vào tab Trình tạo biểu mẫu và ở bên trái, bạn sẽ có thể thấy tất cả các trường biểu mẫu có sẵn được lấy từ hồ sơ khách hàng tiềm năng. Lưu ý rằng nếu bạn có các trường tùy chỉnh cho khách hàng tiềm năng, bạn sẽ có thể bao gồm các trường tùy chỉnh của mình bên trong biểu mẫu dễ dàng bằng cách kéo và thả.
Chỉ có 1 ngoại lệ trong đó các trường tùy chỉnh loại Hyperlink không có hỗ trợ để được đưa vào biểu mẫu web để dẫn.
Để thêm một trường vào biểu mẫu, chỉ cần kéo trường sang bên phải trong khu vực biểu mẫu.
Sau khi bạn kéo trường, bạn sẽ có thể thấy ở phía bên trái, khả năng kéo vào trường này sẽ bị tắt. Bạn chỉ có thể thêm trường trong biểu mẫu một lần để tránh nhầm lẫn với dữ liệu biểu mẫu.
Tùy chỉnh các trường trong Manage.vn CRM
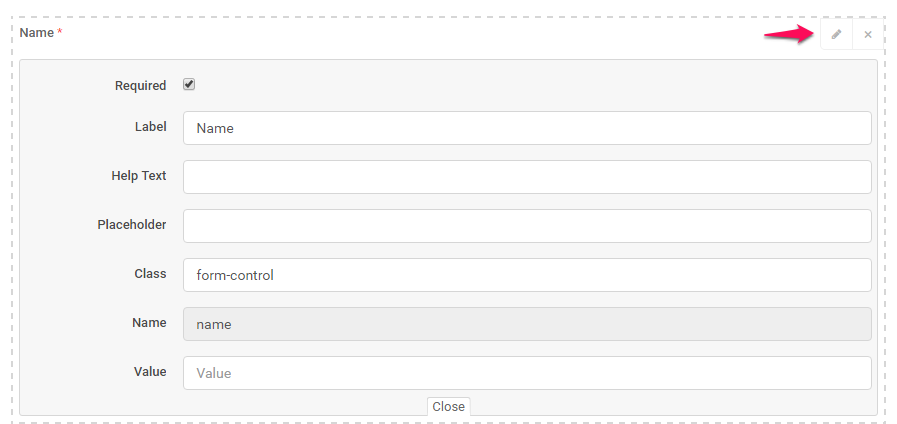
Nếu các trường phù hợp chính xác với nhu cầu của bạn, bạn có thể tùy chỉnh nhãn, và thêm văn bản trợ giúp, ghi đè và yêu cầu điền mới cho gửi. Khi bạn kéo trường trong vùng biểu mẫu, chỉ cần di chuột qua trường ở phía trên bên phải, bạn sẽ có thể thấy 2 nút (chỉnh sửa và xóa)
After you customized the form click on the bottom left button SAVE and click on the tab Integration Code to get the code you need to add to your website. The code will be placed as iframe and you can adjust the width and height directly to the code snippet provided by Manage.vn CRM.
Sau khi bạn tùy chỉnh biểu mẫu, nhấp vào nút dưới cùng bên trái LƯU và nhấp vào tab tích hợp để nhận mã bạn cần thêm vào trang web của mình. Mã sẽ được đặt dưới dạng iframe và bạn có thể điều chỉnh chiều rộng và chiều cao trực tiếp thành đoạn mã được cung cấp bởi Manage.vn CRM.
Tùy biến hiển thị
Nếu bạn cần định kiểu màu của các trường đầu vào để phù hợp với trang web của mình, bạn có thể tạocustom.cssfile in assets/css và áp dụng các phong cách cần thiết.
Đừng quên để bao gồm các <? Php thẻ mở ở phía trên cùng của tập tin nếu nó chưa được bổ sung..
Hãy nhớ rằng bạn sẽ cần phải thay đổi url logo.
Tạo bố cục biểu mẫu nhiều cột trong web để dẫn biểu mẫu
Theo mặc định, các trường biểu mẫu sẽ được thêm vào trong một cột toàn bộ chiều rộng của tài liệu nếu bạn muốn tùy chỉnh biểu mẫu và có các trường được hiển thị trong nhiều cột, chúng tôi đã thêm khả năng đạt được điều này với các lớp tùy chỉnh được áp dụng cho trường, bạn có thể thêm tối đa 12 cột trong 1 hàng.
Trong ví dụ sau, chúng tôi sẽ tạo 2 trường trong 2 cột và 1 hàng.
Hãy ghi nhớ rằng các cột này sẽ không được áp dụng trong xây dựng hình thức, chỉ khi biểu mẫu được xem bằng cách truy cập vào liên kết tích hợp hoặc nằm trong iframe.
Đây là một ví dụ nhanh:
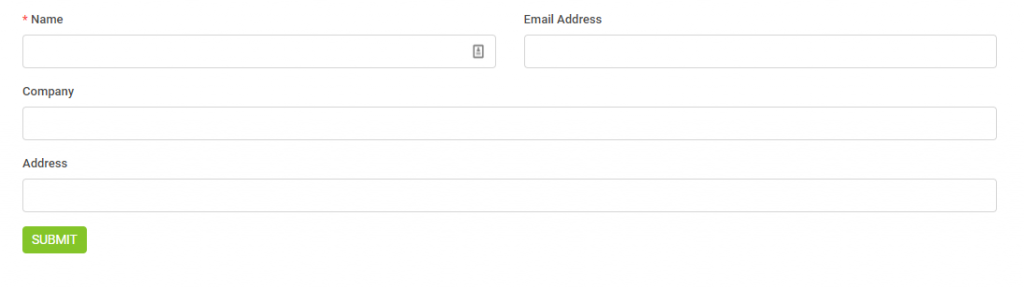
Kết quả cuối cùng:
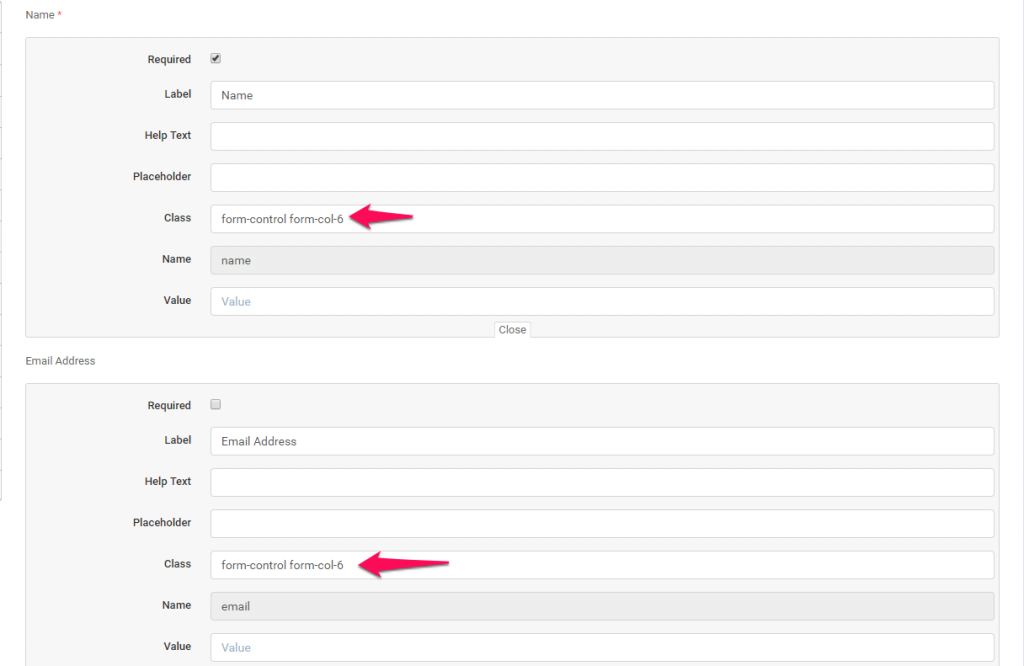
Giả sử rằng trong trình tạo biểu mẫu của bạn, bạn có 4 trường, như thứ tự Tên, Địa chỉ email, Công ty, Địa chỉ.
Đối với 2 trường đầu tiên, nhấp vào nút EDIT ở phía trên bên phải của trình bao bọc trường để trượt xuống vùng chỉnh sửa, trong đầu vào lớp thêm một lớp bổ sung cho cả hai trường form-col-6 như trong hình bên dưới.
Lưu biểu mẫu bằng cách nhấp vào nút lưu và xem trước biểu mẫu từ liên kết tích hợp để xem kết quả cuối cùng.
Như đã đề cập trước khi bạn có thể thêm tối đa 12 cột, trong trường hợp này, form-col-6 + form-col-6 = 12, trong trường hợp bạn muốn thêm 3 cột, hãy áp dụng lớp form-col-4 trên 3 trường (biểu mẫu Các trường -col-4 * 3 sẽ là 12 và các trường sẽ khớp với tài liệu) lần lượt theo thứ tự.
Bởi vì trong hầu hết các trường hợp, bạn sẽ nhúng biểu mẫu vào một vùng chứa / phần nhỏ của trang web của mình, CSS lưới bootstrap vẫn sẽ hiển thị các cột hàng mới (không chia thành 2 cột), trong trường hợp này, hãy xem xét thêm một lớp bổ sung khác cho các vùng chứa nhỏ , ví dụ: nếu bạn đã thêm lớp form-col-6, hãy thêm lớp bổ sung cho diện tích nhỏ form-col-xs-6, bấm vào đây để kiểm tra xem cái này sẽ trông như thế nào
Vài điều cần xem xét
Không bao giờ rời khỏi biểu mẫu mà không có các trường bắt buộc. Theo mặc định, trường tên sẽ được yêu cầu và nó không được khuyến nghị để bỏ chọn theo yêu cầu.
Khi đặt mã đoạn mã iframe, có vài điều bạn cần xem xét.
Nếu giao thức cài đặt Manage.vn CRM của bạn là HTTP thì hãy sử dụng trang HTTP bên trong iframe.
Nếu giao thức cài đặt Manage.vn CRM của bạn là https thì hãy sử dụng trang https bên trong iframe.
Cần có SSL cho trang liên kết và ngược lại.
Không thể Đăng nhập vào quản trị viên?
Sai truy cập URL
Manage.vn CRM khu vực quản trị được tách ra khỏi khu vực khách hàng.
Thường xảy ra Manage Manage CRM người mua bị nhầm lẫn và cố gắng đăng nhập như quản trị viên trong khu vực khách hàng.
Admins cần phải đăng nhập tại yourdomain.com/crm/admin Customers đăng nhập tại yourdomain.com/crm/clients
Reset mật khẩu tại phpmyadmin
TCPDF ERROR: [Image] Không thể lấy kích thước của hình ảnh
Không thể có được kích thước của hình ảnh là một lỗi được ném nếu TCPDF có thể lấy dữ liệu hình ảnh khi sử dụng một đường dẫn tuyệt đối.
Vấn đề bắt đầu hiển thị sau khi bạn thêm URL tuyệt đối tùy chỉnh trong Setup->Settings->PDF, trong trường hợp này, tập lệnh đang cố gắng tìm nạp hình ảnh với yêu cầu cURL nhưng yêu cầu không thành công, bạn có thể liên hệ với nhà cung cấp dịch vụ lưu trữ của mình để đảm bảo rằng tiện ích mở rộng cURL của bạn được định cấu hình đúng và cập nhật, nếu không hãy thử làm theo các bước bên dưới và thêm đường dẫn tương đối vào hình ảnh logo của bạn.
Trước khi bắt đầu, cách giải quyết cho vấn đề này đảm bảo rằng URL bạn đã thêm trong Cài đặt-> Cài đặt-> PDF cho hình ảnh logo pdf tùy chỉnh là hợp lệ và hình ảnh tồn tại nếu sự cố vẫn tồn tại hãy thử thêm một đường dẫn tương đối như được đề cập bên dưới .
Tải hình ảnh lên thư mục nơi Manage.vn CRM được cài đặt, ví dụ mylogo.jpg
Chuyển đến Cài đặt -> Cài đặt -> PDF -> URL Logo Công ty PDF tùy chỉnh và chỉ thêm mylogo.jpg
Trong trường hợp này, đường dẫn tương đối (crm_installation_path / mylogo.jpg) cho hình ảnh sẽ được sử dụng và tập lệnh sẽ có thể tìm nạp hình ảnh.
Hình ảnh logo phải nằm trong thư mục cài đặt Manage.vn CRM.
Nhân viên không nhận được email khi vé mới được tạo hoặc trả lời được đăng
Nếu bạn đang gặp vấn đề này, hãy chắc chắn rằng / các nhân viên khác của bạn thuộc về bộ phận mà vé này được chỉ định.
Chỉ các nhân viên thuộc bộ phận bán vé sẽ nhận được thông báo khi một vé mới được tạo hoặc trả lời vé đã được đăng bởi khách hàng.
Ngoài ra, bạn có thể điều hướng đến Cài đặt-> Mẫu email và kiểm tra lại tất cả mẫu email có sẵn của vé để đảm bảo rằng chúng không bị tắt.
Phương thức thanh toán không được hiển thị trên hóa đơn
1. Đảm bảo rằng bạn đã kiểm tra chế độ thanh toán cho hóa đơn này.
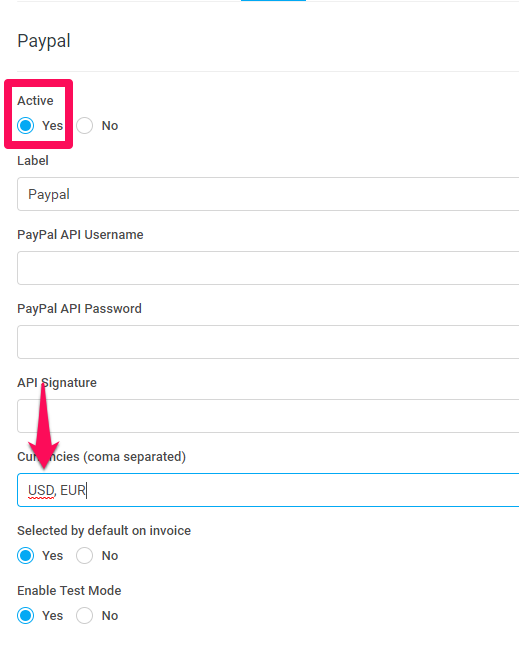
2. Nếu chế độ thanh toán là cổng thanh toán trực tuyến, hãy đảm bảo rằng tiền tệ hóa đơn khớp với các loại tiền được phân tách bằng dấu phẩy trong Cài đặt-> Cài đặt-> Cổng thanh toán và cổng thanh toán được kích hoạt.
Điều hướng đến Cài đặt-> Tài chính-> Tiền tệ và kiểm tra xem Mã tiền tệ có khớp với các loại tiền được phân tách bằng dấu phẩy như trong ví dụ hình ảnh thứ hai không.
Manage.vn CRM không chịu trách nhiệm về loại tiền mà cổng thanh toán sẽ lập hóa đơn, trong hầu hết các trường hợp, cổng thanh toán sử dụng loại tiền được hỗ trợ và tiền tệ tài khoản của họ. Trong yêu cầu, Manage.vn CRM đang chuyển tiền nhưng điều này không có nghĩa là cổng sẽ thực hiện chuyển đổi.
Bạn là quản trị viên / người tạo hóa đơn có trách nhiệm đảm bảo rằng bạn đã cung cấp cho khách hàng của mình các cổng thông tin chính xác có sẵn cho hóa đơn. Bạn phải biết loại tiền mà khách hàng của bạn sẽ trả để bạn có thể điều chỉnh hóa đơn.
Tiêu đề bảo mật không hợp lệ khi thiết lập Paypal
Tiêu đề bảo mật Paypal không phải là thông báo lỗi hợp lệ có thể được hiển thị vì các lý do sau:
Bạn đã thiết lập thông tin xác thực trực tiếp và bạn đã chuyển chế độ Kiểm tra sang BẬT. Nếu bạn muốn kiểm tra, bạn cần đặt thông tin TEST và có Tài khoản Sandbox Paypal
Bạn có khoảng trắng trong thông tin đăng nhập của bạn. Phương trình api_username_1a242jdj2455 – Bạn thấy có bao nhiêu khoảng trắng sau biểu thức.
Bạn đặt sai thông tin API sai vị trí cũ. Dữ liệu Chữ ký API bạn đặt trong trường Tên người dùng API bên trong các trường Paypal của Paypal.
Bạn sẽ cần định cấu hình cài đặt SMTP cho Manage.vn CRM nếu bạn muốn gửi e.q. hóa đơn, ước tính, nhắc nhở quá hạn, vv. Cấu hình SMTP sẽ hoạt động như một email chung từ Manage.vn CRM cho tất cả các email sẽ được gửi.
Để định cấu hình tính năng gửi email trong Manage.vn CRM điều hướng đến Cài đặt-> Cài đặt-> Email.
Tùy chọn cấu hình
Dưới đây bạn có thể đọc về tùy chọn cấu hình email để làm quen hơn, tuy nhiên, trong hầu hết các trường hợp, bạn sẽ chỉ cần điều chỉnh một vài trong số chúng như được đề cập trong các ví dụ của chúng tôi dưới đây.
Hệ thống Mail
Manage.vn CRM cung cấp hai công cụ email, theo mặc định PHPMailer sẽ được chọn. Sự khác biệt giữa công cụ thư là các thư viện được sử dụng để gửi email từ Manage.vn CRM.
Nếu bạn quyết định sử dụng PHPMailer (được khuyến nghị), thư viện chịu trách nhiệm này sẽ là thư viện email php phổ biến PHPMailer, bạn có thể đọc thêm về thư viện bằng cách nhấp vào đây
Công cụ thư khác là thư viện khung Codeigniter mặc định, có thể tìm thêm thông tin bằng cách nhấn vào đây
Tuy nhiên, bạn không nên lo lắng về điều này nhiều, chỉ cần chọn một trong những bạn nghĩ rằng phù hợp với bạn.
Email Protocol
SMTP, Sendmail, và Mail.
Hệ thống rất khuyến khích cấu hình giao thức SMTP để gửi email nếu bạn không muốn gặp phải các vấn đề với email sẽ bị spam hoặc mã hóa, các ví dụ dưới đây sẽ hoàn toàn đúng đối với giao thức SMTP giống như giao thức được đề xuất.
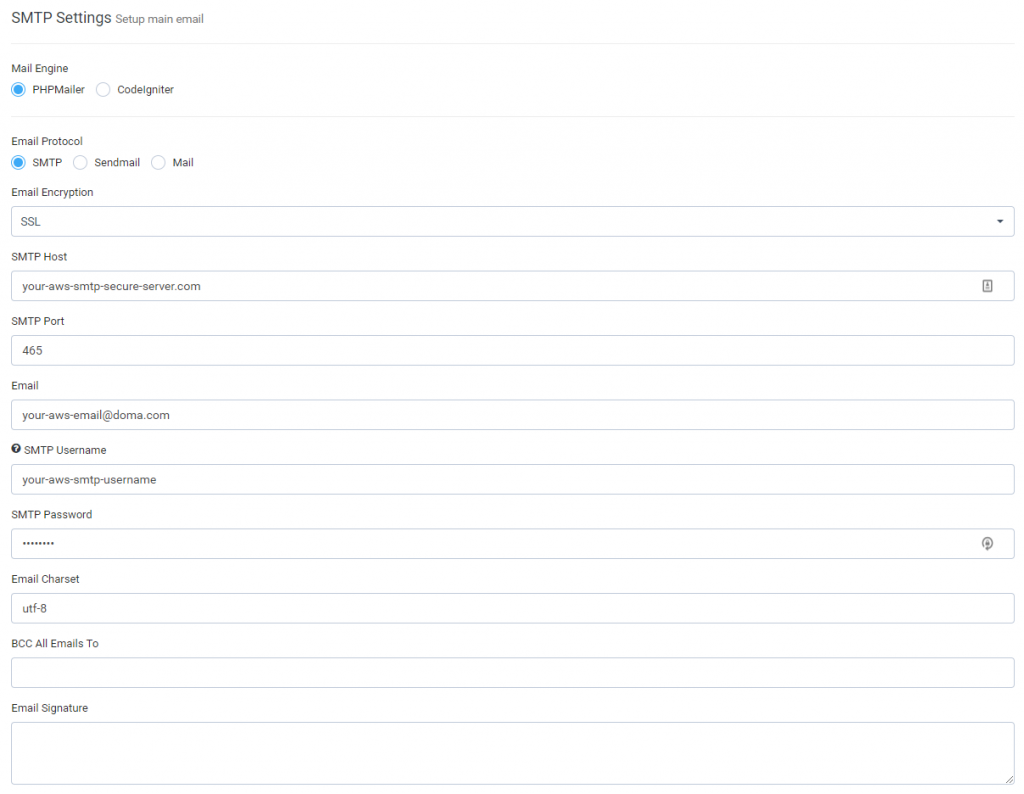
Email Encryption
SSL – Chọn nếu bạn đang cấu hình SMTP với cổng 465
TLS – Chọn nếu bạn đang cấu hình SMTP với cổng 587
None – Chọn nếu bạn đang cấu hình SMTP với cổng 25
Tóm tắt, SSL hoạt động với cổng 465, TLS hoạt động với cổng 587 và nếu bạn đang cố gắng định cấu hình cấu hình SMTP với cổng 25 (không bảo mật) thì sẽ không có mã hóa và bạn nên chọn Không.
SMTP Host
Nhập tên máy chủ SMTP của bạn.
SMTP Port
Nhập cổng SMTP của bạn
Không trộn lẫn các chế độ này; Mã hóa email được đặt thành SSL trên cổng 587 hoặc TLS trên cổng 465 sẽ không hoạt động.
Email
Nhập email SMTP mà bạn đang cố định cấu hình làm email chung cho Manage.vn CRM, trong hầu hết các trường hợp, đây sẽ là thư chỉ được sử dụng để gửi email từ Manage.vn CRM, e.q. bạn có thể tạo một tài khoản email với tên no-reply @ hoặc info @, tuy nhiên, điều này tùy thuộc vào bạn để xác định mức độ phù hợp nhất cho nhu cầu của bạn.
SMTP Username
Chỉ điền nếu ứng dụng email của bạn sử dụng tên người dùng để đăng nhập SMTP, chủ yếu bạn sẽ điền vào trường này nếu bạn đang sử dụng hộp thư trao đổi.
Trong hầu hết các trường hợp khi bạn đang sử dụng máy chủ trao đổi, bạn sẽ cần đăng nhập bằng tên người dùng chứ không phải bằng địa chỉ email, trong trường hợp này, Manage.vn CRM sẽ sử dụng trường Tên người dùng SMTP để đăng nhập vào máy chủ thư của bạn thay vì địa chỉ email , tuy nhiên, địa chỉ Email bạn đã điền ở trên sẽ vẫn được sử dụng làm tiêu đề TỪ.
SMTP Password
Điền mật khẩu để đăng nhập, bạn sẽ biết mật khẩu của mình.
Email Charset
Mặc định là UTF-8, bạn đã thắng Thay đổi điều này bao giờ, bởi vì trong hầu hết các trường hợp, điều này hoạt động tốt, tuy nhiên, nếu bạn quyết định thay đổi mã hóa, nó rất khuyến khích thực hiện vài nghiên cứu để xem mã hóa nào phù hợp nhất với bạn.
BCC All Emails To
Bạn có thể thêm email để được thêm làm tiêu đề BCC nếu bạn muốn theo dõi và nhận bản sao của tất cả các email được gửi từ Manage.vn CRM nếu bạn cần thêm nhiều email BCC, phân tách chúng bằng dấu phẩy.
Email Signature
Chữ ký email toàn cầu cho tất cả các email được gửi, có thể được sử dụng làm trường hợp nhất được thêm vào trong các mẫu email trong Cài đặt-> Mẫu email, hãy nhớ rằng tùy chọn này có thể bị ghi đè nếu e.q. nhân viên đang gửi hóa đơn đến email đã định cấu hình chữ ký email tùy chỉnh trong hồ sơ của mình.
Header & Footer được xác định trước
Cài đặt Manage.vn CRM theo mặc định đi kèm với một tiêu đề được xác định trước và chân trang được xác định trước cho tất cả các mẫu email, tiêu đề và chân trang được xác định trước là khá sạch nhưng nếu bạn cần một cái gì đó nhiều hơn thì hãy điều chỉnh mã này.
Nội dung thư email được hợp nhất ở giữa tiêu đề và chân trang được xác định trước e.q.
[predefined header code]
Thông điệp email
[predefined footer code]
Vì vậy, ví dụ: nếu bạn đã mở <div> trong tiêu đề và bạn không đóng <div> HTML trong khi định dạng tiêu đề, bạn PHẢI đóng (</ div>) thẻ HTML ở chân trang.
Nhấn vào đây để tìm hiểu thêm về HTML
Cài đặt AWS Email SMTP
Trong trường hợp bạn đang sử dụng AWS để gửi email, liên hệ chúng tôi để tìm hiểu thêm.
Ví dụ:
Các ví dụ dưới đây là các ví dụ chung về cách định cấu hình SMTP để gửi email, hãy nhớ rằng các ví dụ có thể khác với yêu cầu máy chủ thực tế của bạn, tốt nhất là tham khảo ý kiến của nhà cung cấp dịch vụ lưu trữ để cung cấp cho bạn cấu hình SMTP chính xác.
SMTP server over port 25
Encryption: None SMTP Host: yoursmtphost.com SMTP Port : 25 SMTP Email: Your email SMTP Password: Your password
SMTP servers that require SSL connection
Encryption: SSL SMTP Host: yoursmtphost.com SMTP Port : 465 SMTP Email: Your email SMTP Password: Your password
For Gmail use the following configuration:
Encryption: SSL SMTP Host: smtp.gmail.com SMTP Port : 465 / For TLS encryption use port 587 SMTP Email: [email protected] SMTP Password: Your password
If you are using Gmail / G Suite you need to have enabled less secure apps in your account.
Testing SMTP Setup
Nếu bạn cần kiểm tra thiết lập SMTP của mình, chỉ cần vào Cài đặt -> Cài đặt -> Email và cuộn xuống Gửi Email Kiểm tra để nhập địa chỉ email của bạn và nhấp vào nút gửi. Nếu SMTP được thiết lập chính xác, bạn sẽ nhận được thông báo màu xanh lá cây nói rằng email của bạn được thiết lập chính xác, một email sẽ được gửi đến địa chỉ email bạn đã nhập nếu không thông báo gỡ lỗi từ ứng dụng email sẽ được hiển thị.
Sau khi bạn định cấu hình cài đặt SMTP, bạn sẽ cần kiểm tra xem cấu hình có được cấu hình đúng không và nó có hoạt động tốt không.
Trong khi bạn đang ở trong Cài đặt-> Cài đặt-> Email và cuộn xuống Gửi Email kiểm tra để nhập địa chỉ email của bạn và nhấp vào nút gửi. Nếu SMTP được thiết lập chính xác, bạn sẽ nhận được thông báo màu xanh lá cây nói rằng email của bạn được thiết lập chính xác, một email sẽ được gửi đến địa chỉ email bạn đã nhập nếu không thông báo gỡ lỗi từ ứng dụng email sẽ được hiển thị.
Các vấn đề thường gặp & Xử lý sự cố
Khi bạn cố gắng gửi email kiểm tra, nếu cấu hình không thành công, bạn sẽ có thể thấy một khối lỗi ở trên cùng, vui lòng đọc kỹ thông báo khối gỡ lỗi để bạn có thể xác định nguyên nhân gây ra sự cố của mình, thông báo khối gỡ lỗi sẽ chứa thông báo lỗi được trả về từ máy chủ email của bạn, trong hầu hết các trường hợp sẽ có dạng như: Kết nối không thành công. Lỗi # 2: stream_socket_client (): không thể kết nối với ssl: //smtp.gmail.com: 465 (Kết nối bị từ chối), nhưng điều này sẽ phụ thuộc vào máy chủ thư của bạn và công cụ thư bạn đang sử dụng (PHPmailer hoặc Codeigniter), tuy nhiên , hầu hết các thông báo lỗi sẽ tương tự.
Chúng tôi khuyên bạn nên tham khảo ý kiến của nhà cung cấp dịch vụ lưu trữ nếu bạn không thể định cấu hình SMTP cho Manage.vn CRM (Bạn nên dùng dịch vụ VPS của Manage.vn), vấn đề trong hầu hết các trường hợp có liên quan đến cấu hình máy chủ của bạn e.q. Lỗi DNS, chặn tường lửa, nhà cung cấp dịch vụ lưu trữ đang chặn các kết nối ra ngoài vv. Bạn nên nói chuyện với họ, đọc tài liệu của họ, trong trường hợp này, chỉ nhà cung cấp dịch vụ lưu trữ của bạn mới có thể giúp bạn!
Bạn có thể muốn thực hiện một vài loại nghiên cứu về thông báo lỗi cụ thể mà bạn đang làm quen với cách bạn có thể giải quyết vấn đề này. ServerSMTP đã đăng một bài viết và hướng dẫn tốt về các lỗi và mã SMTP phổ biến, ngoài ra, chúng tôi khuyên bạn nên kiểm tra hướng dẫn khắc phục sự cố của PHPMailer bằng cách nhấp vào đây
Cài đặt email không lưu hoặc nhận lỗi 404 khi lưu
Điều này có thể xảy ra do các quy tắc tường lửa được định cấu hình trên máy chủ web của bạn, bởi vì trong Cài đặt-> Cài đặt-> Email trong tiêu đề và chân trang tùy chọn được xác định trước có HTML và tường lửa đang ngăn HTML này lưu vào cơ sở dữ liệu.
Để kiểm tra điều này, bạn có thể điều hướng đến Cài đặt-> Cài đặt-> Email và để trống các tùy chọn đầu trang và chân trang được xác định trước, sau đó thử lưu cài đặt để xem điều này có hoạt động tốt không.
Nếu việc lưu thành công, bạn nên cố gắng tham khảo ý kiến của nhà cung cấp dịch vụ lưu trữ để vô hiệu hóa các quy tắc tường lửa như vậy, trong hầu hết các trường hợp, điều này có thể xảy ra do mod_security hoặc Suhosin.
Failed to connect to server: 111 Connection refused
Lỗi từ chối kết nối được ném trực tiếp từ máy chủ thư của bạn và có thể xảy ra nếu nhà cung cấp dịch vụ lưu trữ của bạn chặn các cổng ra, SMTP, trong hầu hết các trường hợp xảy ra do các cổng bị chặn qua tường lửa.
Nếu bạn định cấu hình SMTP trên các cổng 465 hoặc 587, hãy đảm bảo rằng các cổng 465 và 587 đang mở, nếu bạn không quản lý máy chủ, hãy liên hệ với nhà cung cấp dịch vụ lưu trữ của bạn để kiểm tra trực tiếp điều này.
If your authentication is failing, there are several likely causes:
You have the wrong username or password
Your connection is being diverted to a different server (as above)
You have specified authentication without encryption
Generally, you do not want to send username or password over an unencrypted link. Some SMTP authentication schemes do add a minimal level of security (sending short hashes rather than clear text), but these provide only minimal protection, and so most servers do not allow authentication without encryption. Fix this by setting SMTP Encryption to TLS and Port to 587 as well as filling the Email and Password field.
Các sự cố thường gặp với Gmail hoặc G Suite – Tên người dùng hoặc mật khẩu không hợp lệ
Tên người dùng hoặc mật khẩu không hợp lệ khi sử dụng Gmail hoặc G-Suite có thể là một lỗi phổ biến nếu bạn đã biến ứng dụng Ít bảo mật thành BẬT, tuy nhiên, trước tiên, nó được khuyến nghị để kiểm tra xem mật khẩu của bạn có đúng không.
G-Suite
Sign in to the Google Admin console.
Click Security > Basic settings.
Under Less secure apps, select Go to settings for less secure apps.
In the subwindow, select the Allow users to manage their access to less secure apps radio button.
In case you are not receiving the emails and your SMTP configuration test email is showing that the configuration is working properly, take a look at the following articles:
Nếu bạn đã bật xác thực 2 yếu tố trên Tài khoản Google của mình, bạn PHẢI tạo mật khẩu ứng dụng và thêm mật khẩu vào trường mật khẩu trong Manage.vn CRM nằm trong Cài đặt-> Cài đặt-> Email
Nếu bạn vẫn nhận được tên người dùng hoặc mật khẩu không hợp lệ và bạn đang quản lý máy chủ, hãy thử điều này:
Log in as cPanel user, go to MX Entry, select domain, set to the remote exchanger.
Log into WHM, go to Tweak Settings, disable “Restrict outgoing SMTP”
Không thể khởi tạo chức năng thư
Lỗi này còn được gọi là không thể gửi email bằng thư PHP () nếu bạn đang sử dụng công cụ thư Codeigniter và có nghĩa là cài đặt PHP của bạn không được cấu hình để gọi hàm mail () chính xác (ví dụ: sendmail_path không được đặt chính xác trong php.ini của bạn) hoặc bạn không có máy chủ thư cục bộ nào được cài đặt và định cấu hình.
Tuy nhiên, lỗi có thể được hiển thị nếu bạn đang cố gắng định cấu hình giao thức Mail, không được khuyến nghị.
SELinux blocking
Nếu bạn thấy một lỗi như SMTP -> LRI: Không thể kết nối với máy chủ: Quyền bị từ chối (13), bạn có thể đang chạy vào SELinux ngăn PHP hoặc máy chủ web gửi email.
Email Templates
Để thiết lập các mẫu email điều hướng đến Cài đặt -> Mẫu email và thay đổi nội dung theo nhu cầu của bạn.
Bạn có thể thiết lập chữ ký email chung trong Cài đặt-> Cài đặt-> Email, chữ ký này sẽ được sử dụng trên tất cả các email đại diện cho công ty của bạn.
Tất cả các mẫu email sẽ được gửi từ email chung được định cấu hình trong Cài đặt-> Cài đặt-> Email.
Làm thế nào đa ngôn ngữ cho các mẫu email được sử dụng?
Customer 1 có ngôn ngữ English
Customer 2 có ngôn ngữ Dutch
Khi một mẫu email sẽ được gửi cho Khách hàng 1, nội dung sẽ được lấy từ mẫu email tiếng Anh, đối với nhân viên Khách hàng 2, nội dung sẽ được lấy từ mẫu email của Hà Lan.
Các thủ tục tương tự được áp dụng cho các nhân viên.
Khi gửi mẫu email đến khách hàng tiềm năng eq. đề xuất ngôn ngữ mặc định hệ thống sẽ được sử dụng.
Điều gì sẽ xảy ra nếu nội dung trống cho mẫu email và người dùng sử dụng ngôn ngữ này?
Trong trường hợp nội dung của mẫu trống đối với một ngôn ngữ cụ thể không phải là ngôn ngữ hệ thống mặc định, nội dung từ mẫu email sẽ được lấy từ thiết lập ngôn ngữ hệ thống mặc định trong Cài đặt-> Cài đặt -> Bản địa hóa. Hãy chắc chắn rằng bạn luôn điền vào mẫu ngôn ngữ hệ thống mặc định.
Hệ thống sẽ tự động trượt xuống các ngôn ngữ được sử dụng trên hệ thống dựa trên nhân viên và khách hàng khi bạn điều hướng để chỉnh sửa mẫu email cụ thể.
Vô hiệu hóa các mẫu email
Mở mẫu email và kiểm tra trường bị vô hiệu hóa. Nếu trường bị vô hiệu hóa được kiểm tra, email này sẽ không được gửi bao giờ.
Phương trình Nếu bạn muốn tắt gửi email chào mừng khi tạo liên hệ, hãy điều hướng đến Cài đặt-> Mẫu email và tìm mẫu có tên: Khách hàng mới đã thêm / đăng ký (Email chào mừng) kiểm tra hộp kiểm bị vô hiệu hóa và lưu.
AWS Email SMTP Setup
Khi sử dụng AWS để gửi email, cần thực hiện các bước bổ sung để có thể gửi email từ Manage.vn CRM. Thực hiện theo các bước bên dưới để định cấu hình SMTP với AWS.
If you are using version 2 or above, make sure that in Setup->Settings->Email you selected PHPMailer as mail engine.
The email you will enter will be used as FROM email which when using AWS is required. Find the configuration below.
Email Queue
Vấn đề rất phổ biến là khi hệ thống gửi nhiều email, eq khi nhận xét mới về nhiệm vụ hoặc trạng thái nhiệm vụ bị thay đổi, hệ thống sẽ gửi email đến người tạo tác vụ, người theo dõi nhiệm vụ, người phân công nhiệm vụ, v.v.
Hành động này có thể là thời gian -một khi liên quan đến gửi email, hệ thống sẽ cần thời gian để kết nối với máy chủ email và gửi email, thời gian thực hiện hành động này thực sự phụ thuộc từ máy chủ email đến máy chủ email, một số máy chủ thực hiện hành động nhanh hơn.
Tính năng sẽ lưu trữ email và tất cả nội dung trong cơ sở dữ liệu và khi công việc định kỳ sẽ chạy, các email sẽ được gửi trong nền, trong trường hợp này, người dùng sẽ không nhận thấy bất kỳ sự chậm chạp nào. Để bật tính năng xếp hàng email bạn cần điều hướng đến Cài đặt-> Cài đặt-> Email và nhấp vào tab Hàng đợi email và đặt Bật hàng đợi email thành CÓ.
Hãy nhớ rằng sau khi bật tính năng xếp hàng email, các email sẽ không được gửi ngay lập tức, sẽ có sự khác biệt về thời gian trong 5 vài phút cho đến khi cron job run.Không thêm email với tệp đính kèm trong hàng đợi. Nhiều khả năng bạn sẽ gặp vấn đề với hàng đợi email nếu hệ thống cần thêm các tệp lớn vào hàng đợi. Nếu bạn dự định sử dụng tùy chọn này, hãy tham khảo ý kiến của quản trị viên máy chủ / nhà cung cấp dịch vụ lưu trữ của bạn để tăng các tùy chọn max_allowed_packet và Wait_timeout trong cấu hình máy chủ của bạn, nếu không, tùy chọn này được đặt thành có, hệ thống sẽ không thêm email với tệp đính kèm trong hàng đợi và sẽ được gửi ngay lập tức.
Điều này chủ yếu được áp dụng cho các tài liệu pdf eq hoặc khi gửi một số tệp theo cách thủ công, quá trình này rất đơn giản, bạn nên để tùy chọn này thành Không nếu bạn không chắc chắn mình đang làm gì. Trước khi bật tính năng xếp hàng email, hãy chắc chắn rằng công việc cron đang chạy đúng mỗi 1 phút.
This is a guide on how to use customer management software and project management. To use, please contact the System department at Manage to install the software. We will install the entire tool on the server and send you the login information. If you want to install on your server. Please meet the following configuration:
PHP 5.6.4+ (PHP 7.1+ recommended)
MySQL 5.1+
mod_rewrite Apache
MySQLi PHP Extension
PDO PHP Extension
cURL PHP Extension
OpenSSL PHP Extension
MBString PHP Extension
iconv PHP Extension
IMAP PHP Extension
GD PHP Extension
Zip PHP Extension
allow_url_fopen enabled
Our System Admin will not configure your server for Security and Dispute Reasons if a problem occurs (Simply because the Admin is managing your server has disabled some of these functions For some reason, it will affect the Website or other system you are using.)
So if during the installation an error occurs due to your server. Please contact your IT department to fix this yourself. Then inform us to continue to install CRM system & Project Management Manage.vn.
If you do not have a private server. Don’t worry because at Manage.vn when you use the system. We have free servers strong enough for the first 12 months for your peace of mind to use.
HotKeys
The following hotkeys are only available for the adminarea, hotkeys are not supported in the customers area.
Create New Records
Shift + C – Create New Customer
Shift + I – Create New Invoice
Shift + E – Create New Estimate
Ctrl+Shift+P – Create New proposal
Ctrl+Shift+E – Create New Expense
Shift+L – Create New Lead (opens the lead modal)
Shift+T – Create New Task (opens new task modal)
Shift+P – Create New Project
Shift+S – Create New Support Ticket
Ctrl+Shift+S – Create New Staff Member
Navigate To Specific Areas
Alt+D – Go To Dashboard
Alt+C – Go To Customers List
Alt+T – Go To Tasks List
Alt+I – Go To Invoices List
Alt+E – Go To Estimates List
Alt+P – Go To Projects List
Alt+L – Go To Leads List
Ctrl+Alt+T – Go To Tickets List
Ctrl+Alt+E – Go To Expenses List
Alt+R – Go To Sales Report
Alt+S – Go To Settings
Misc
Shift+K – Top search bar focus and ready for searching
Shift+D – Tables search focus and ready for searching (matches only first table found in the document)
Ctrl+Shift+L – Logout
Conditional hotkeys
Shift+F
Mark the current task as finished – Applicable only when task modal is opened
Shift+E
Edit current task – Applicable only when task modal is opened
Edit lead – Applicable only when the lead modal is opened
Shift+C
Convert a current lead to a customer – Applicable only when the lead modal is opened
Create new task comment – Applicable only when the task modal is opened
The hotkeys mentioned above are only tested on Windows OS
System Language
Create New Language
In Manage.vn CRM you can easily change the language. You only need to translate all the strings based on your needs.
Navigate to application/language and copy the default english folder.
Rename to folder in the language you want to translate. eq. french
You must to rename the files inside based on the main folder name eq. we renamed our new folder to french and this folders should be renamed like this: french_lang.php
Translate all the strings via your favourite code editor and navigate to Setup -> Settings -> Localization you will see that your language is available in the dropdown select it and save changes.
If the language you are trying to translate already exists in Manage.vn CRM files that comes with the package its recomended to rename the folder/files eq. my_french and my_french_lang.php
If you are using language that don’t exist in Manage.vn CRM make sure after each update to copy all the new text after # Version X.X.X from the original English file located in application/language/english/english_lang.php
Overwriting translation texts
Read more here to see how to overwrite translation texts to make Manage.vn CRM fit for your needs.
Encoding
Language files in Manage.vn CRM use the UTF-8 encoding without a Byte Order Marker, when creating language override files it is important to maintain the same encoding.
Github
All the language files are available on Github, if you wan’t to contribute translation you can create pull request and we will review the language and approve the pull request. Click here to check the github repository.
Special Charachters
If you want to use the ‘ character in your translation text you have to replace it with ’
Eq:
$lang['language_text_key'] = 'Text with 'quotes';
Setup Web to Lead Form
Manage.vn CRM Web to Lead feature allow you to build a web form based on leads fields and custom fields to place it on your website, landing page etc as an iframe.
The visitors can then enter their names, email addresses, upload attachment and other basic information to create a lead directly in Manage.vn CRM.
To create new web to lead form, from the main admin menu navigate to Setup->Leads->Web To Lead
Click on the button on the top left side New Form
NOTE: You will be able to build the form after you first create the initial form including all the settings.
Form Name – Give your form a name, it’s for personal use and also will be displayed in the lead profile when you open lead.
Language – The language is currently used only for the validation messages.
Submit button text – The bottom where the user will need to click to submit the form E.q. Request a Quote or Contact us, feel free to adjust to fit your needs.
Message to show after the form is successfully submitted – This message will be shown after use successfully submit the form.
Allow duplicate Leads to be inserted into a database? – Often in web to lead forms duplicate leads are inserted into database. Manage.vn CRM has the ability to prevent this from happening by auto creating the lead as task including all form data as a description instead of inserting directly to the leads database, in this case, the responsible staff member will need to analyze the lead data and take further actions.
Source – Default lead source
Status – The lead will need to be in status after successfully is imported into Manage.vn CRM database.
Responsible – Auto assign the lead to a specific staff member.
Notification settings – All users based on the notification type will be notified via built in notification inside Manage.vn CRM and additionally the responsible lead staff member will get an email notification if in Setup->Email Templates -> New Lead Assigned to Staff Member is not checked as disabled.
Recaptcha – You can use Google Recaptcha to prevent spamming. The field for Google Recaptcha will be shown only if you have previously configured the recaptcha keys.
After you create the form 2 new tabs will be shown in the form area Form Builder and Integration Code.
Form Builder – The place where you build the form and adjust all the fields you need.
Integration Code is the code you will need to place into your website the form to be shown, note that from the link you will be able to see that each for have unique key.
Building The Form
When you save the initial form settings you will be automatically pointed on the Form Builder tab and on the left side you will be able to see all the available form fields taken from the lead profile. Note that if you have custom fields for leads you will be able to include your custom fields inside the form easy with drag and drop.
There is only 1 exception where the custom fields of type Hyperlink do not have support to be included in the web to lead form.
To add a field to the form just drag the field to the right side in the form area.
After you drag the field you will be able to see on the left side the dragging ability to this field will be disabled. You can only add the field in the form once to prevent confusion with the form data.
Customizing The Fields
If the fields don’t fit exactly for your needs you can customize the labels, add help text, placeholders and make them required. When you drag the field in the form area just hover over the field on the top right side you will be able to see 2 buttons (edit and remove)
After you customized the form click on the bottom left button SAVE and click on the tab Integration Code to get the code you need to add to your website. The code will be placed as iframe and you can adjust the width and height directly to the code snippet provided by Manage.vn CRM.
Styling
If you need to style the color of the input fields to fit with your website you can create custom.cssfile in assets/css and apply the necessary styles.
Don’t forget to include the <?php opening tag at the top of the file if it’s not already added.
Keep in mind that you will need to change the logo url.
Create Multi-Column Form Layouts in Web To Lead Form (available from v1.9.0)
By default, the form fields will be added in a single column full width of the document if you want to customize the form and have the fields displayed in multiple columns we have added the ability to achieve this with custom classes applied to the field, you can add up to 12 columns in 1 row.
In the following example, we will create 2 fields in 2 columns and 1 row.
Keep in mind that the columns won’t be applied in the form builder, only when the form is viewed by accessing the integration link or is in an iframe.
Here is a quick example:
Final result:
Assume that in your form builder you have 4 fields, as in order Name, Email Address, Company, Address.
For the first 2 fields click on the EDIT button on the top right side of the field wrapper to slide down the edit area, in the class input add an additional class for both fields form-col-6 as shown in the image below.
Save the form by clicking on the save button and preview the form from the integration link to see the final result.
As mentioned before you can add up to 12 columns, in this case, form-col-6 + form-col-6 = 12, in case you want to add 3 columns apply the class form-col-4 on 3 fields (form-col-4*3 fields will be 12 and the fields will fit the document) that are one by one in order.
Because in most cases you will embed the form into a small container/portion of your website, the bootstrap grid CSS will still show the columns new rows (not split in 2 columns), in this case, consider adding another additional class for small containers, for example if you added form-col-6 class, add additional class for small areaform-col-xs-6, click here to check how this should look
Few things to consider
Never leave the form without required fields. By default, the name field will be required and it’s not recommended to uncheck as required.
When placing the iframe snippet code there are few things you need to consider.
If the protocol of your Manage.vn CRM installation is HTTP then use an HTTP page inside the iframe.
If the protocol of your Manage.vn CRM installation is https than use an https page inside the iframe.
Summarized will be no SSL Manage.vn CRM installation will need to place the link in no SSL eq landing page and backward, SSL websites with SSL Manage.vn CRM installation and no SSL website with none SSL Manage.vn CRM installation. You can read more about this here
Can’t Login to Admin Area?
Wrong URL access
Manage.vn CRM admin area is separated from the customers area.
Often happen Manage.vn CRM buyers to get confused and trying to login as admin in the customers area.
Admins need to log in at yourdomain.com/crm/admin Customers login at yourdomain.com/crm/clients
Resetting password via phpmyadmin
TCPDF ERROR: [Image] Unable to Get the Size of the Image
Unable to get the size of the image is an error thrown if TCPDF can’t fetch the image when using an absolute path.
The problem starts showing after you add custom absolute URL in Setup->Settings->PDF, in this case, the script is trying to fetch the image with cURL request but the request is unsuccessful, you can contact your hosting provider to make sure that your cURL extension is properly configured and it’s up to date, otherwise try to follow the steps below and add relative path to your logo image.
Before start, the workaround for this problem makes sure that the URL you have added in Setup->Settings->PDF for the custom pdf logo image is valid and the image exists if the problem still exists try to add a relative path like mentioned below.
Upload the image to the folder where Manage.vn CRM is installed for example mylogo.jpg
Go to Setup -> Settings -> PDF -> Custom PDF Company Logo URL and only add mylogo.jpg
In this case, the relative path (crm_installation_path/mylogo.jpg) for the image will be used and the script will be able to fetch the image.
The logo image must be in the folder where Manage.vn CRM is installed.
Staff Members Not Receiving Email When New Ticket Is Created or Reply Is Posted
If you are experiencing this problem make sure that your/other staff members belong to the department which this ticket is assigned.
Only the staff members that belong to the ticket department will receive notification when a new ticket is created or a ticket reply has been posted by a customer.
Additionally, you can navigate to Setup->Email Templates and re-check all ticket available email template to make sure that they are not disabled.
Payment Modes Not Shown on Invoice
1. Make sure that you have checked the payment mode for this invoice.
2. If the payment mode is online payment gateway make sure that the invoice currency matches the comma separated currencies in Setup->Settings->Payment Gateways and the payment gateway is active.
Navigate to Setup->Finance->Currencies and check if the Currency code matches the comma separated currencies like in the second picture example.
Manage.vn CRM is not responsible in what currency the payment gateway will bill, in most cases the payment gateway use their supported currencies and account currency. In the request, Manage.vn CRM is passing the currency but this not means that the gateway will do a conversion.
You as administrator/invoice creator are responsible to make sure that you gave your customer the correct available gateways for the invoices. You must know in what currency your customer will pay so you can adjust the invoice.
Security Header Not Valid When Setting up Paypal
Paypal security header is not valid error message can be shown because of the following reasons:
You have set up live credentials and you have turned Test mode to ON. If you want to test you need to set TEST credentials and have Paypal Sandbox Account
You have white spaces in your credentials. Eq. api_username_1a242jdj2455 – You see how much whitespaces after the Eq.
You put wrong API credential in wrong place ex. API Signature data you put in the API Username field inside Manage.vn CRM Paypal fields.
You will need to configure SMTP settings for Manage.vn CRM if you want to send e.q. invoices, estimates, overdue reminders etc… the SMTP config will act as a general email from Manage.vn CRM for all emails that will be sent.
In order to configure the send email feature in Manage.vn CRM navigate to Setup->Settings->Email.
Configuration options
Below you can read about the email configuration option to get more familiar with, however, in most cases, you will need to adjust only a few of them as mentioned in our examples below.
Mail Engine
Manage.vn CRM offers two email engines, by default PHPMailer will be selected. The difference between mail engine is the libraries used to send emails from Manage.vn CRM.
If you decide to use PHPMailer (which is recommended), the responsible library for this will the popular php email library PHPMailer, you can read more about the library by clicking here
The other mail engine is the default Codeigniter framework library, more info can be found by clicking here
However, you should not worry about this that much, just select the one that you think fits for you.
Email Protocol
SMTP, Sendmail, and Mail.
It’s highly recommended to configure the SMTP protocol for sending emails if you don’t want to encounter issues with emails going to spam or encoding, the examples below will be strictly for the SMTP protocol as it’s the recommended one.
Email Encryption
SSL – Select if you are configuring SMTP with port 465
TLS – Select if you are configuring SMTP with port 587
None – Select if you are configuring SMTP with port 25
Summarized, SSL works with port 465, TLS works with port 587 and if you are trying to configure the SMTP config with port 25 (non-secure) there will be no encryption and you should select None.
SMTP Host
Enter your SMTP hostname.
SMTP Port
Enter your SMTP port
Don’t mix up these modes; Email encryption set to SSL on port 587 or TLS on port 465 will not work.
Email
Enter the SMTP email you are trying to configure as a general email for Manage.vn CRM, in most cases, this will be a mail only used for sending emails from Manage.vn CRM, e.q. you can create an email account with name no-reply@ or info@, however, this is up to you to determine how best fit for your needs.
SMTP Username
Fill only if your email client use username for SMTP login, mostly you will fill this field if you are using an exchange mailbox.
In most cases when you are using exchange server, you will need to log in with username not with the email address, in this case, Manage.vn CRM will use the SMTP Username field to log in to your mail server instead of the email address, however the Email address you filled above will be still used as a FROM header.
SMTP Password
Fill the password for login, you should already know your password.
Email Charset
The default is UTF-8, you won’t need to change this ever, because in most cases this works fine, however, if you decide to change the encoding it’s highly recommended perform few researches to see what encoding is best fit for you.
BCC All Emails To
You can add email to be added as BCC header if you want to keep track and get copies of all emails sent from Manage.vn CRM if you need to add multiple BCC emails, separate them by a comma.
Email Signature
Global email signature for all emails sent, can be used as merge field added in email templates in Setup->Email Templates, keep in mind this option can be overridden if e.q. the staff that is sending an invoice to an email have configured custom email signature in his profile.
Predefined Header & Predefined Footer
Manage.vn CRM installation by default comes with a predefined header and predefined footer for all email templates, the predefined header and footer is pretty clean but if you need something more then this, feel free to adjust the code.
The email message contents are merged in between the predefined header and footer e.q.
[predefined header code]
The email message
[predefined footer code]
So for example, if you opened a <div> in the header and you did not close the <div> HTML while formatting the header, you MUST close (</div>) the HTML tag in the footer.
Click here to learn more about HTML
AWS Email SMTP Setup
In case you are using AWS for sending emails, click here to learn more.
Email Queue
If you are looking in the Email Queue option, click here to read more.
Email Templates
Click here to read more about the email templates in Manage.vn CRM
Examples
The below examples are general examples how to configure SMTP to send an email, keep in mind that the examples may be different then your actual server requirements, the best is to consult with your hosting provider to provide you the correct SMTP configuration.
SMTP server over port 25
Encryption: None SMTP Host: yoursmtphost.com SMTP Port : 25 SMTP Email: Your email SMTP Password: Your password
SMTP servers that require SSL connection
Encryption: SSL SMTP Host: yoursmtphost.com SMTP Port : 465 SMTP Email: Your email SMTP Password: Your password
For Gmail use the following configuration:
Encryption: SSL SMTP Host: smtp.gmail.com SMTP Port : 465 / For TLS encryption use port 587 SMTP Email: [email protected] SMTP Password: Your password
If you are using Gmail / G Suite you need to have enabled less secure apps in your account.
Testing SMTP Setup
If you need to test your SMTP setup just go to Setup -> Settings -> Email and scroll down to Send Test Email to enter your email address and click the submit button. If the SMTP is setup correctly you will receive green notifications saying that your email is set up correctly also an email will be sent to the email address you entered otherwise debug message from the email client will be shown.
After you configure the SMTP settings, you will need to test if the configuration is properly configured and it is working fine.
While you are in Setup->Settings->Email and scroll down to Send Test Email to enter your email address and click the submit button. If the SMTP is setup correctly you will receive green notifications saying that your email is set up correctly also an email will be sent to the email address you entered otherwise debug message from the email client will be shown.
Common Issues & Troubleshooting
When you try to send a test email, if the configuration is not successfully, you will be able to see an error block on the top, please read the debug block message carefully so you can determine what is causing your issue, the debug block message will contain the error message returned from your email server, in most cases will be something like: “Connection failed. Error #2: stream_socket_client(): unable to connect to ssl://smtp.gmail.com:465 (Connection refused) ” but this will depend on your mail server and the mail engine you are using (PHPmailer or Codeigniter), however, most of the error messages will be similar.
We highly recommend you to consult with your hosting provider if you are not able to configure SMTP for Manage.vn CRM, the problem in most cases is related to your server config e.q. DNS failure, firewall blocking, hosting provider is blocking outbound connections etc… you should talk to them, read their docs, in this case, only your hosting provider can help you!
You may want to perform a few types of research about the specific error message you are getting to get more familiar with how you can resolve this. ServerSMTP posted a good article and guides for common SMTP errors and codes, also it’s highly recommended to check thePHPMailer troubleshooting guide by clicking here
Email settings not saving or getting 404 error when saving
This can happen because of firewall rules configured on your web server, because in Setup->Settings->Email in the predefined option header and footer there is an HTML and the firewall is preventing this HTML saves into the database.
To test this you can navigate to Setup->Settings->Email and leave blank the predefined header and footer options then try to save the settings to see if this will work fine.
If the save is successful, you should try to consult with your hosting provider to disable such firewall rules, in most cases, this can happen because of the mod_security or Suhosin.
Failed to connect to server: 111 Connection refused
Connection refused error is thrown directly from your mail server and may happen if your hosting provider is blocking outbound ports, SMTP, in most cases happens because of blocked ports via a firewall.
If you are configuring SMTP on ports 465 or 587, make sure that the ports 465 and 587 are open, if you are not managing the server, contact your hosting provider to check this directly.
GoDaddy blocks outbound SMTP; you have to use GoDaddy’s own mail servers.
Click here to read more.
Authentication failures
If your authentication is failing, there are several likely causes:
You have the wrong username or password
Your connection is being diverted to a different server (as above)
You have specified authentication without encryption
Generally, you do not want to send username or password over an unencrypted link. Some SMTP authentication schemes do add a minimal level of security (sending short hashes rather than clear text), but these provide only minimal protection, and so most servers do not allow authentication without encryption. Fix this by setting SMTP Encryption to TLS and Port to 587 as well as filling the Email and Password field.
Common issues with Gmail or G Suite – Invalid username or password
Invalid username or password when use Gmail or G-Suite can be a common error if you haven’t turned Less Secure Apps to ON, however, it’s recommended first to check if your password is correct.
G-Suite
Sign in to the Google Admin console.
Click Security > Basic settings.
Under Less secure apps, select Go to settings for less secure apps.
In the subwindow, select the Allow users to manage their access to less secure apps radio button.
In case you are not receiving the emails and your SMTP configuration test email is showing that the configuration is working properly, take a look at the following articles:
If you are have enabled 2-factor authentication on your Google Account, you MUST generate application password and add the password in the password field in Manage.vn CRM located in Setup->Settings->Email
Click here to read how to generate App Password.
If you are still getting invalid username or password and you are managing the server try this:
Log in as cPanel user, go to MX Entry, select domain, set to the remote exchanger.
Log into WHM, go to Tweak Settings, disable “Restrict outgoing SMTP”
Could not instantiate mail function
This error is also known as “Unable to send email using PHP mail()” if you are using the Codeigniter mail engine and means that your PHP installation is not configured to call the mail()function correctly (e.g. sendmail_path is not set correctly in your php.ini), or you have no local mail server installed and configured.
Click here to read more.
However, the error may be shown if you are trying to configure the Mail protocol, which is not recommended.
SELinux blocking
If you see an error like SMTP -> ERROR: Failed to connect to server: Permission denied (13), you may be running into SELinux preventing PHP or the web server from sending an email.
Click here to read more.
Email Templates
To set up email templates navigate to Setup -> Email templates and change the content according to your needs.
You can set up a general email signature in Setup-> Settings-> Email, this signature will be used on all email representing your company.
All email templates will be sent from the general email that is configured in Setup->Settings->Email.
How multi-language for email templates is used?
Customer 1 have language English
Customer 2 have language Dutch
When an email template will be sent to Customer 1 the content will be taken from English email template, for staff Customer 2 the content will be taken from Dutch email template.
The same procedure is applied for staff members.
When sending email template to lead eq. proposal the system default language will be used.
What will happen if the content is empty for email template and user use this language?
In case the content for the template is empty for a specific language which is not the default system language the content from the email template will be taken from the default system language setup in Setup->Settings ->Localization. Make sure you always populate the default system language template.
The system will auto slide down the languages that are used over the system based on staff and customers when you navigate to edit specific email template.
Disabling email templates
Open email template and check the disabled field. If the disabled field is checked this email wont be sent ever.
Eq. If you want to disable sending welcome email when creating contact navigate to Setup->Email Templates and find the template with name: New Customer Added/Registered (Welcome Email) check the disabled checkbox and save.
AWS Email SMTP Setup
When using AWS for email sending additional steps are required to perform in order to be able to send emails from Manage.vn CRM. Follow the steps below to to configure SMTP with AWS.
If you are using version 2 or above, make sure that in Setup->Settings->Email you selected PHPMailer as mail engine.
The email you will enter will be used as FROM email which when using AWS is required. Find the configuration below.
Email Queue
If you are using at least version 1.9.4, we have added a feature for email queue to speed up the email sending process.
Very common issue is when the system is sending a lot of emails, eq when a new comment on task, or task status is changed, the system will send an email to task creator, task followers, task assigners etc…
This action may be time-consuming when it’s related to email sending, the system will need time to connect to the email server and sends the emails, the time taken for this action really depends from email server to email server, some servers performs the action faster.
The email queue feature will store the emails and all contents in the database and when the cron job will run, the emails will be sent in the background, in this case, the users won’t notice any slowness.
To enable email queue feature you need to navigate to Setup->Settings->Email and click on the Email Queue tab and set Enable Email Queue to YES.
Keep in mind that after enabling the email queue feature the emails won’t be sent immediately, there will be a time difference in 5 minutes till the cron job run.
Do not add emails with attachments in the queue
Most likely you will encounter problems with the email queue if the system needs to add big files to the queue. If you plan to use this option consult with your server administrator/hosting provider to increase the max_allowed_packet and wait_timeout options in your server config, otherwise when this option is set to yes the system won’t add emails with attachments in the queue and will be sent immediately.
This is mostly applied to eq pdf documents or when sending some files manually, this process is straightforward, it’s recommended to leave this option to No if you are not sure what are you doing.
Before enabling email queue feature make sure that your cron job is running properly each 1 minute.